Showing posts with label 3D. Show all posts

Friday, 14 March 2014

Alien_workshop02|Machinima

Last step I had to do in order to get my alien moving was to create a rig and bind it to the mesh. I had played with joint tool and IK handles before and was fairly familiar with the tools, but still learnt a lot in a process.
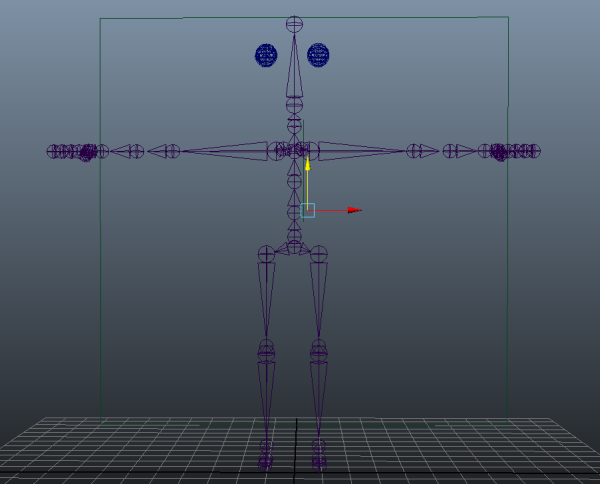
First, I've created a joint chains that served a skeleton.Leg rigs are using IK (inverse kinematics) and arm are FK (foward kinematics). I've added extra joint in forearm in order to make more natural looking movement when twisting arm (we don't have this joint, but in 3D software you sometimes have to change few things). Next step was creating custom controllers (eg. feet, hands) with Nurbs and CVs.

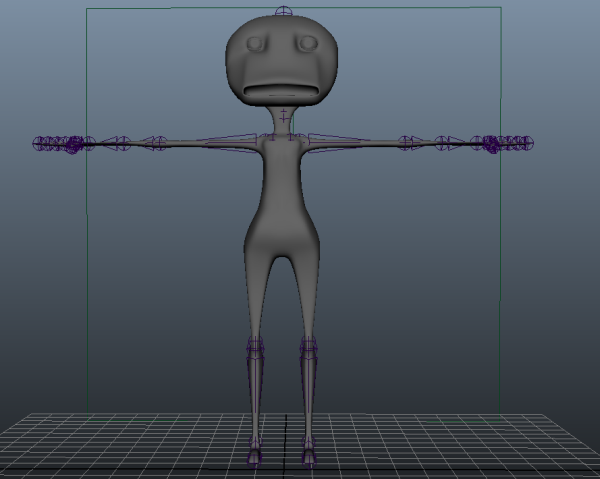
Attaching joints to mesh - binding. Fairly straigthfoward, used smooth bind option. Painting weights and taking influence off from end joints was next (except for brow joints) and was time consuming but necessary.

After that I was finally able to keyframe my animations. I did 3 different idles, a walk and a jump animation, which I exported as FBX file. Used Unity to cut footage and a script made by Anabeth to put my alien model on a nice mirror pedestal.

Thursday, 27 February 2014

Alien_workshop01|Machinima

This week task was to create an alien model based on given referance. Finished mesh will be used in rigging tutorial. After final model is made it should be UV mapped and textured. It was a very challenging task for me, as I'm still quite new to Maya, but I've learnt a lot.

I've started with a cube primitive and kept on modeling half of the alien, as adviced by Mat.

At this stage my model was really simplified as I was concentrating on getting main parts correct (eg. leg, torso, arm).

 Next step was to finish up a rough model. I had everything in place and the only thing left was to model head. That part of modelling was really hard for me. Heads are way more complex than they look. For mouth I've extruded some mesh and moved it inside the model. Eyes were done separetly as two spheres (eye ball and eye lids).

I've tried to smooth my model a bit by moving vertexes and edges, as well as adding extra faces (or deleting unnecessary ones).

I've created a final model by merging together both half. It was quite an easy process, as it required only using a specific for this task tool (and flipping model along -X axis). However I've ended up with few holes in my model, which I sew by using another tool.

I'm particulary proud with how the legs and body (torso and bottom) have came out. Head looks a bit weird and I might try to fix later, but overall I'm happy with final model.

Thursday, 21 November 2013

Alien 3D model tests|VFX

I've decided to do a little test of my alien in Maya, simply because I wanted to have a nice comparison between 2D and 3D.
The model I've created is very basic and untextured. I've added a very simple 5-joint rig for a tail part and four 3-joint rigs for the head/base.
I've key framed tail to move from left to right (pendulum motion) and set frames for head/base to imitate jellyfish-like movement. Next step was to render all frames and use After Effects to create sequence. I've saved all my Maya render files to .png so my finished sequence had transparent background (yay for alpha channels). I've used one of interior photos of Kia Rio as a back plate to test this really short shot.
Overall I enjoyed playing in Maya but I've found that making a really good model of an alien (and then UV maping it) would be a bit too time consuming. Also it doesn't really match the final look I want to achive. However I will definately use above process for quick prototyping (which will come useful when working on more complex shots).

Tuesday, 15 October 2013

Little Freak - Animation

Little Freak is a short 3D animation created by Edwin Shaap and is a part of biggest project (master thesis)


The story is about little boy who.. oopps! Just scroll up and watch it yourself.
I find this little animation quite sad and a bit depressing, which is probably elevated by limited colour pallet to black and white (no colours at all really). Voice acting is very good, emotional and moving. However story itself is really generic and simple. Personally, I'm not sure if it's a good or bad thing.


The most impressive part of this animation is the way face of little boy is rendered and animated, with attention to the tiniest detail.


Edwing Shaap shared 'Making - of' video which explains how he achived the end result (and how much time it took him to do it). In the future I'd also try to use a range of different media to achieve the better quality.

Friday, 4 October 2013

Visual Effects and Animation for Film Production - checklist

Checklist for Visual Effects and Animation for Film Production module

main deadlines:

  • 29.11.2013 - interim crit - 10 mins presentation of pre production research; storyboards, animatic, concept art are ready; look into different locations for shoot, actors, possible sound; research towards achieving specific visual effects also completed
                       -> production and post have to be done during this period (from end of Nov to mid                       
                                                                                                                     January); 
                       ->  shoot film on location; 
                       ->  animating and compositing;
  • 17.01.2014 - final crit - 1min film is ready for presentation, but still could be slightly changed and improved
  • 24.01.2014 - submission deadline : 1 min film submitted in two formats, shot breakdown, tutorial exercises, 15+ blog posts, 1500 evaluation or 5-8 mins podcast.

Monday, 13 May 2013

Game Module| Barrels

Finished barrels for studio tasks.
 
 I've made a quite generic fantasy barrel, again using hand-drawn textures. It was a very good exercise before texturing objects for my level.
I'm really proud of futuristic barrel asset I've created in Maya. Although I had some problems at the start (example below), I've manage to over come them :) Lesson for the future - 'keep face together' box selected!
 Futuristc barrel was heavily inspired by games like Jak & Daxter and Rachet and Clank as they're full of nice, electric crates and barrels :)

Monday, 29 April 2013

Game Module|Shell House Progress

From the start I've knew that modeling shell houses in Maya will be very hard, especially since my concept art was very detailed and complex.
I've had tried few different primitives first to get basic idea, helix and sphere seemed to be the best solutions. However, I found modelling helix into shell is extremely difficult. As mentioned earlier, the other right shape to use was sphere.
  •  A very basic model made with 3 different spheres. Although is very simple it gave me a rough idea of how I can take advantage of this shape.
  • Almost finished model of shell house. Still need a bit more work on it, but I like those results.
  • Another house; since it's bigger it could belong to shaman of this water tribe village.
  •  Due to nature of Unity I had to multiply my houses in order to create a proper, visible walls (Unity, unlike to Maya, wouldn't display polygons that shouldn't be visible in the first place). I got rid of spikes since only inside is important.


Next step is to create a UV map and texture it. I've got introduced to MudBox and might use it for this task.

Sunday, 28 April 2013

Everything I can See From Here | Animation |PPP


Everything I Can See From Here from The Line on Vimeo.

Everything I Can See From Here is an animated short directed by Sam Taylor and Bjorn Aschim for The Line and produced by Fritzi Nicolaus. As it is stated in video description this lovely animation was made over the last two years in our evenings, weekends and days off. There is aso a massive list of other people involved in production process.

Sound & Music was done by Box of Toys Audio.

Everything I Can See From Here - brilliant, well-paced short. I really like hand painted backgrounds and stylised characters as well as nice 3D alien. Storyline, although quite simple and generic, seems very fresh - thanks to nice presentation. Music plays a very important part as it helps set the mood.

As a person very interested in animation, Everything I Can See From Here serves as the perfect example of work I would love to do in the future. Especially when it comes to painted background - beautiful, with subtle and visible brush strokes, great perspective. I've got another 2 more years to improve my drawing skills and try a bit more animation.

Monday, 15 April 2013

Game Module| Crates

Finished models and textures of 2 crates (fantasy and futuristic).


I've used hand-drawn textures on both crates since it's something that I might use in my project (also I found those hand made textures are more unique and interesting). Bump maps and glow added.
Model of fantasy crate is matching my world fantasy theme and could be reused - with just a slight changes in textures.
A little progress shot showing the difference between model with and without bump map and glow.

Tuesday, 19 March 2013

Maya Tutorials|Creating UV maps & crates

Crate I've created by following UV mapping tutorial.
  •  basic cube model with added texture (which I've quickly created in Photoshop)


I went for funky, vivid colors as the level I'm going to create will be very stylized and cartoony (game wise think a bit of Spyro mixed with Rachet and Clank + Rayman + Sly + Psychonauts + Okage: Shadow King ;) )

Friday, 1 March 2013

Finished Animation

Finally, after so many weeks of learning Maya, I can show my finished animation.


It might not look as good as I've imagined it but I've learned a lot during the process.It was a very intense module but thanks to that I'm not a Maya noob anymore ;).

For sounds I've again used findsounds website (previously used during film module).

Cloudy with a Chance of Meatballs

Few days ago a trailer for Cloudy with a chance of Meatballs 2 was realesed. It is going to be a sequel to the first movie.


First animated feature film was realesed back in 2009. Produced by Sony Pictures Animation and distributed by Columbia Pictures, directed by Phil Lord and Christopher Miller. Interesting is a fact that Cloudy with a chance of Meatballs was the second animated film with rendering software Arnold and OpenImageIO (open source image toolkit).
I've really enjoyed first animation, which have a very adorable and cute character and interesting story. Also the style of animation really match the main theme (food). Cloudy with a chance of Meatballs is very cartoony, colourful and funny.

Also, since the Harlem Shake videos became extremly popular on YouTube, Cloudy version was released:


And it's extremly funny when you're familiar with the characters :) Plus it's nicely done.

Sunday, 17 February 2013

Caminandes - Short Movie

Caminandes is a short animated movie made by Pablo Vazquez, Beorn Leonard, and Francesco Siddi after hours. It was inspired by old cartoons made by Chuck Jones.


The story is very simple but also charming. It's about a llama trying to cross the road. Although this was done many times before with other animals, still it makes me smile. Also the sound effects were designe very well for this video.
Caminandes was made in Blender which is just another proof that you don't need expensive software to create a beautiful animated short.

Wreck-it Ralph

Wreck-it Ralph is the animated feature film produced by Walt Disney and directed by Rich Moore.


Wreck-it Ralph is set in a game worlds and contains many referances to the real games as well as characters from them (like Sonic and Bowser). Animation is very fluid, plot - interesting. Also it's fast paced and packed with funny gags. Moreover it's full of stunning visuals and adorable characters.
Wreck-it Ralph was nominated to many awards including Annie Awards for Best Animated Feature, Character Design and Animated Effects.
I've watched Wreck-it Ralph  in 3D last week and I instantly felt in love with it.

Monday, 11 February 2013

3D Modelling & Animation| Hypershade

I've applied colours to my models by using hypershade menu; blinn and lambert were main materials I've used for this task. I've also grouped and named all parts (polygons) of cow model.

Cow:
 

  •  decreasing amount of reflections made it look more like stuffed toy:
I'm thinking about animating eyes by using textures.
UFO:
  
  • for lights I've used anisotropic material.
 
I'm pretty comfortable with using hypershade menu now. The next task on my list is getting background and eye textures done.

Sunday, 10 February 2013

3D Modelling and Animation|Finished models

Finished models of my cow and U.F.O.

Made from simple shapes (mostly sphere) I've also used deformers quite a lot. There is still room for improvement (and probably someone with few years of 3D software experience could do this much more better) but I'm pleased with what I've got so far and as I model more in Maya I will get better :).
Now I need to draw textures and background.

Monday, 4 February 2013

Larva|MondoMedia


Larva is one of my favourite shows on MondoMedia created by a group of Korean animators.


The story and characters are very simple - afterall it's about two larvas living in sewers, but also really bright, colourful and funny. Each episode is about 3mins long. It's definatly one of those shows that are worth watching just because of good humor and nicely animated characters. Also every show ends with little 2D animation of larvas.

Tuesday, 22 January 2013

3D Modelling&Animation|Toy Model001

Since I've became more familiar with Maya I've decided to give a try modelling my toy. It's not the final version and probably I'll model another one and use it in my animation.

 I've learnt a lot while modelling. It's quite simple model of my toy cow but I'm happy with how the legs and head looks. Moreover I've found out that I should model ears from primitive (sphere perhaps) rather than trying to use 'extrude' tool. Also using deformers like squash makes modelling some shapes easier and with more control.

 While modelling my toy I couln't resist making it into a spaceship. Or a 'space cow' to be more precise :).

Monday, 21 January 2013

3D Modelling&Animation|Spaceship ideas

I've decided to give a Maya a try in modelling UFO ideas. I've used sphere as my basic primitive shape and then splayed with squash and twist tools. I've also used extrude and bevel. Slowly I'm becoming more familiar with Maya tools.
 I believe that this one is my favourite model of UFO so far. It's pretty generic but I think it will work well in my short aniamtion.
 Below some more abstract spaceships created from primitive sphere.

  Control panel created from square primitive.  Happy accidents happen too often to me in Maya ;) But I've also learnt a lot while modeling this cosmic desk. Also it's the first time when I've modelled something more complex.


3D Modelling&Animation|Deformers+Colours/Shading

Today we were introduced to another set of tools in Maya called 'deformers'. I've found modelling with them much more easier. However I still don't have much control and most of the models I've created today were actually lucky accidents.

examples


  •  use a 'cone' primitive and then played with 'twist' and 'squash' deformers


Also today we've started adding colours and textures to the objects


It's great that you can key frame textures and use them to animate face of the character. I'll probably use this technique to animate my toy eyes.